Can You Make a Magazine Page Indesign and Upload It Into Another Page
How to prepare InDesign documents for commercial printing: a comprehensive guide
This mail is about preparing InDesign documents to exist printed. It's a long and detailed post, and designed to be worked through (but non necessarily in one get). If you lot want to work though information technology as you read, sign upwardly beneath to access the complimentary threescore page downloadable pdf:
You'll need a CC version of InDesign to work through the exercises - if you don't have it, y'all tin download a thirty day free trial version from adobe.com.
You'll work through a series of documents, each of which will assistance demonstrate some different things to be aware of when you lot're sending a document to be printed. Here'due south an outline of what you'll learn:
-
An overview of the "preflight" procedure
-
How to check for missing images
-
How to check images that have been modified
-
What CMYK colour is
-
How to bank check if images are CMYK
-
What epitome resolution is
-
How to check the resolution of images
-
What bleeds are
-
How to bank check if bleeds are used and how to ready them upwardly
-
How to check for missing fonts
-
How to create a impress ready pdf
An overview of the preflight process
The outset document you'll set up for impress has essentially no issues with it, but y'all'll work through it to get used to some of the different concepts, terminology and areas of InDesign that you'll need to go familiar with.

From the File menu choose Open to open up the a i-Introduction document. This advert is deliberately straightforward and will cause no bug when it's sent to print*, so you'll apply it largely to compare with the documents that will nowadays problems. All you're going to do here is have a close wait at the images used within it, and then create a pdf that's ready to send to a printer.
* As you work through these documents you're going to learn how to bank check these possible areas of business concern before sending a document to a printer: bleed, swatches, fonts, images and transparency. This kickoff document does non crave bleed, it uses just the default black swatch, information technology uses fonts that come installed with InDesign and it features no transparency.
Open the Links Panel past clicking on it at the top right of your screen.

The Links Console contains listing of all the images that have been imported into the document (using the File>Identify command). When you identify an image into InDesign information technology is not strictly imported into the certificate; instead a lower quality version of it is brought in which is linked to the original file on your calculator. It's of import that these links are maintained, so that when you either create a pdf or a packet to send to a printer (more about these later) InDesign can recall the total quality image from the original file.
If InDesign is non able to locate the original file because it's been moved or renamed, you lot'll meet a red question mark next to the image in the Links Panel'southward status column (underneath the triangular icon with the exclamation mark). In the case of these images the cavalcade should exist empty because they are properly linked.

The other preliminary thing to check with the links is to make certain that they oasis't been modified since they were placed into InDesign. Afterward on yous'll learn how to modify images in a way that ensures InDesign tin can keep rails of them, but for now, all you need to know is that if an prototype has been modified without InDesign knowing, there will be a yellowish assertion mark icon in the status column side by side to it. Equally earlier, this should not be the case for these images.
Virtually CMYK
The bulk of all commercially printed work is printed using Four Colour Process (alternatively chosen Four Color, CMYK, Full Colour, Procedure Color). This works by printing the four process colours, Cyan, Magenta, Yellow and blacK (hence CMYK) in a close arrangement of tiny dots in combinations that tin simulate millions of different colours. If you lot expect on the spine of a newspaper you'll probably see the letters CMYK, or possibly little squares or circles printed of those colours. Equally a general guide, anything yous produce that has a colour photograph on it will be produced in Four Color Process.
If y'all are creating a certificate which will exist printed in Process Color, whatever image y'all place into InDesign should ideally be divers using CMYK*. This ways that every i of the thousands or millions of pixels** that make upwards the image contains four pieces of information: how much Cyan, Magenta, Yellow and blacK. As digital cameras and most scanners work in RGB (like monitors, they work with light rather than ink), the majority of the images you will come across will probably be made up of RGB pixels.
* I say ideally considering even if the images are non in CMYK, it's possible for InDesign to convert them when creating a pdf, as you'll detect afterward.
** Yous're probably familiar with the term pixels – if not, it means the tiny squares of color that make upwards a digital image. That is essentially all a digital photo is – many thousands of tiny squares, each ane capable of having its own unique color or shade.
To run across more information most the 1.jpg image, click on its name in the Links Panel.

Data about the epitome appears in the Link Info department at the bottom of the panel.

Equally y'all should be able to encounter from the screenshot higher up, the Color Infinite of this image is CMYK. Click on all of the other jpg images in turn to bank check that they all are too. The final prototype listed (with the .ai suffix) is an Illustrator file. Leave this for at present, but afterward you'll explore a specific event that tin can arise with this blazon of image.
Nearly resolution
Also as checking images to ensure that they are non missing, non modified and take a CMYK colour space, y'all volition as well need to bank check their Resolution. Resolution essentially determines whether an paradigm is of suitable quality to print. Information technology is measured in ppi, the number of pixels per inch. For an image to be suitable quality for on screen work, information technology needs to have around 72ppi. But for printed work, a resolution of around 300ppi is advised. Printers frequently talk of dpi, rather than ppi, but it refers to the aforementioned thing. They likewise volition refer to "High res" and "Low res" images, meaning high and depression resolution, again high res usually meaning around 300ppi.

The Link Info for the 1.jpg image is shown above. Its resolution is shown every bit Actual ppi and Effective ppi. The Bodily ppi is resolution of the image at its original size (300) and the Constructive ppi is the resolution at the sized that information technology's used on the page (312)*.
* The reason they are different is considering the image has been fabricated slightly smaller within InDesign, and as it's measured past the number of pixels per inch of the paradigm, if the image is made smaller the resolution volition consequently get up. This is what is meant by the Effective ppi.
Click on each link in turn and you should come across that for each one the Effective ppi is effectually 300, which is what yous should ideally exist aiming for. If they are not, you'll be taking a risk that they will look poor quality.
Creating a impress-ready pdf
As mentioned previously, whilst there are several other checks you'd commonly make before sending your document to be printed, in this example you've made all the advisable ones, so now you'll export the advert as a pdf.
To create a pdf choose Consign from the File card. In the dialogue box that appears y'all'll need to choose the Adobe PDF (Print) format, requite it an appropriate name and relieve information technology in a suitable location. Once you've done that, a dialogue box appears that contains a choice of pdf export options. Whole books take been written on the best settings to use hither – I'1000 going to simply advise two options.
The starting time is to inquire your printer to supply you with a Preset of the settings they would recommend. They can either talk the setting through to you for you to type in, or send you a job options file. For the purpose of this exercise yous'll proceed to the next step, only the footnote below gives you instructions to follow if you are sent settings by your printer.
If they were to supply you with a file, you'd choose File>Adobe PDF presets>Ascertain, then printing the Load button, locate the file they'd sent, and so press the Done button. When you next use the File>Export control, the options they sent volition be in the list of Adobe PDF Presets at the superlative of the dialogue box.
In your instance (and generally in the absenteeism of advice or a preset given past your printer), choose the [PDF/Ten-1a:2001] preset from the options at the acme of the Export Adobe PDF dialogue box. This preset'south settings were created to be used in advertising, and are generally agreed to work amongst print professionals, then you're unlikely to get any nasty surprises. Printing the Consign push button to finish creating the pdf, and if you lot want to await at it, locate it where you lot saved it and double-click on it to open up it.

Summary of checks you lot made and then far:
-
Checked for missing images (Links Panel: Status cavalcade)
-
Checked for modified images (Links Panel: Status column)
-
Checked that images were CMYK (Links Console: Link Info)
-
Checked the resolution of images (Links Panel: Link Info)
Summary of commands used so far:
-
File>Open up
-
File>Export (to create a pdf)
2. Essential checks: bleeds, fonts, links, resolution
The previous certificate was setup set up to go to print, but this 1 is not. Hither y'all'll discover how to work with images that are missing, images with a low resolution, fonts that are missing and learn nearly bleeds.

From the File menu cull Open to open the a two-Essential-checks document. Before the document has fifty-fifty opened yous should be presented with a dialogue box warning y'all that one of the links is missing.

Once you've pressed the OK push button you'll probably* exist presented with another dialogue box, this time telling you lot that this document uses a font that y'all don't take installed on your computer.
* If you lot've previously installed this font on your computer yous won't see this dialogue box appear.
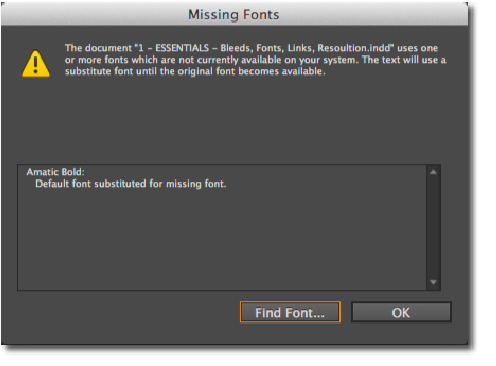
The dialogue box invites you lot to apply the Find Font command to fix the problem, only ignore it for now by pressing the OK push.

Once the document is opened, if you don't accept the Amatic Bold font installed, the text will appear highlighted in pinkish to alert you that the missing font has been substituted with one that yous do take on your computer. You lot could also consider it a none likewise subtle reminder that you lot need to fix this – which you will shortly.
Before y'all fix the font problem you lot'll accost the missing link. Click once on the Links Panel to open it, and observe the red question mark icon in the link condition column side by side to the visit_cuba_white.eps file.
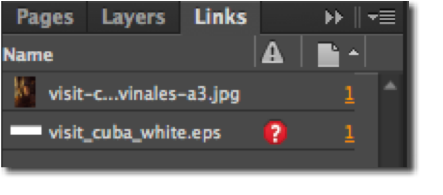
Double click on the question mark icon to relink the file*, which is another way of saying that you'll tell InDesign where information technology tin can locate the missing image.
* If you lot have InDesign CS6 or later y'all might accept noticed at that place is likewise a missing link icon on the logo itself. You can alternatively relink by double-clicking directly on that.

To cease the process of relinking you now accept to locate the original paradigm. In this instance I'thousand going to tell you where it is, only in everyday work you'd perhaps demand to search on your computer, enquire a colleague, customer, photographer or designer to send information technology to you. Look in the Logos folder (inside the Preparing InDesign documents for print binder) and click on the visit_cuba_white.eps logo to relink it. When yous return to the document you lot'll notice the ruby-red icon has disappeared.
Whilst in the Links Panel click on the visit-republic of cuba-vinales-a3.jpg image and await at its resolution in the Link Info Panel. Notice that the Effective ppi of this epitome is 72. This means that it's a low resolution image, suitable for viewing on screen, but not for being commercially printed.

For the purposes of these exercises it doesn't make any divergence what the paradigm's resolution is, just on a real project it'south important that the images are of sufficient quality. Equally mentioned previously they should ideally be effectually 300ppi. If they are non, you'll be taking a hazard that they will look poor quality. If this happens to yous, your options are to source higher resolution images from the photographer, employ different images, use them at smaller sizes, or equally a final resort resample the image using Photoshop'southward Image Size control (which is beyond the remit of this postal service).
Notice likewise in the Link Info that this image'due south Colour Space is RGB and non CMYK. Whilst this is something that can't be adapted in InDesign, the programme makes it piece of cake for yous to open the image in Photoshop and alter it at that place. Before you learn how to do this I should mention that whilst it'southward commonplace for designers to use Photoshop to convert images from RGB to CMYK, information technology'southward not strictly essential to do this, because if you create a pdf from InDesign using a setting such as [PDF/Ten-1a:2001] it volition convert whatever RGB images and swatches to CMYK as information technology does it.

To open up the paradigm in Photoshop make sure the image is selected at the summit of the Links Console, press on the dropdown carte du jour at the superlative correct of the panel and choose Edit With from the list of commands that appear. A list of suitable programs volition appear – if you lot have Photoshop installed on your computer, choose that.
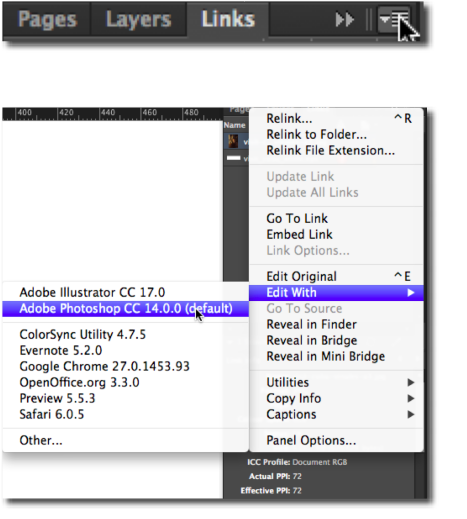
In Photoshop, choose Image>Mode>CMYK. Then salvage and close the file, and render to InDesign. When you lot click on the image the Info Console should at present point that it is a CMYK epitome.
Most missing fonts
In the same way that InDesign needs admission to the original images that take been placed in a document before creating a pdf, information technology also needs admission to whatever fonts that were used when creating information technology. As you've already seen, you volition be altered by ways of a dialogue box and the pinkish highlighting of text that you need to bargain with missing fonts. To accept a closer look at this, from the Type menu choose Detect Font.

The Discover Font command lists all of the fonts used in the document and highlights ones that are missing by means of a yellow exclamation mark icon. In this document only one font is used, Amatic Bold, and it is missing.

How you lot'll handle missing fonts will be depend on the circumstances. In some cases the font that is missing might not be critical for the blueprint or branding and tin can exist easily substituted for another one you do accept. In that instance you'd utilise the Find First and Change or Modify All buttons on the right to search for the places where the font is used have InDesign replace it with a different one. But it's more likely that you lot'd fix the problem by installing that font on your computer. The font used here is 1 whose designer has fabricated freely bachelor. If yous desire to install it, press the Done button to leave the Find Font dialogue box*.
* If you'd rather not install it, follow these instructions to replace it with a different font that you have on your calculator. Click on the Amatic Bold font at the height of the dialogue box, cull a font from the listing at the lesser of the dialogue box, then printing the Change All push button to supercede every case of Amatic Bold with the font of your choice.
You can download the Amatic Bold font for free from
www.fontsquirrel.com. While y'all're in that location you might also want to download the Permanent Marker, Signika and Ubuntu fonts that y'all'll use in afterward exercises. Instructions on how to install them can be constitute at world wide web.fontsquirrel.com/aid You might detect this Wiki How tutorial useful for installing on a PC: www.wikihow.com/Install-Fonts-on-Your-PC and Mac users can find a similar tutorial here: world wide web.youtube.com/watch?five=3AIR7_ch9No
Once y'all've installed the font and returned to InDesign you should notice the pink highlight has disappeared, indicating that the font is no longer missing.
Nigh Bleeds
As you know, the blackness edge around every page edge indicates the border of the document, but that's not the full story. When you send an InDesign document to a commercial printer they are oftentimes printed on sheets or rolls of newspaper that are larger than the document size. They are then trimmed down to size on a guillotine, whose blade is lined upward with Trim Marks (run across the diagram beneath).

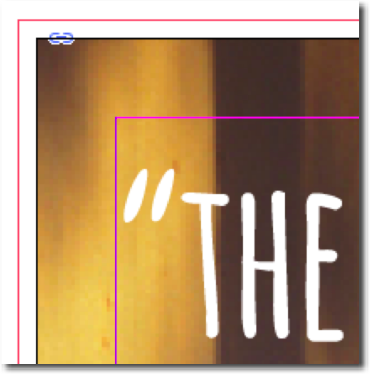
The black edge represents where the trimming should occur. However, as the guillotine bract runs through a stack of paper its bract may bend slightly, and your document may be trimmed slightly inside or outside the black line. To business relationship for this, any elements that need to appear right at the border of a page need to continue, or 'bleed' over the edge. A bleed guide makes it straightforward to create bleeds, as objects snap to the guide that sits just outside the edge of the page. The diagram below shows a shut up of the superlative left corner of a document with a bleed guide.

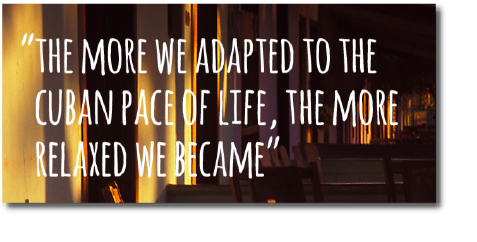
As you can see from the screenshot below, this poster has a photograph that extends to the edge of the page on every side, and so it should have a bleed guide. However there is no bleed guide, and the image simply stops at the border of the page. If the bleed guide wasn't set upwardly when the document was created it can be added later. You'll do this now by choosing Document Setup from the File menu.

At the bottom of the Certificate Setup dialogue box you should see a dropdown push next to the words Drain and Slug*.
* If you're using a version of InDesign prior to CC (any of the CS versions) you'll instead press the More than Options push button towards the superlative right of the New Document dialogue box to reveal the Bleed and Slug values.

One time you can see the Drain and Slug values, enter 3mm for one of the Bleed values and click on the padlock to use the same value to all edges of the document. Then press the OK button.

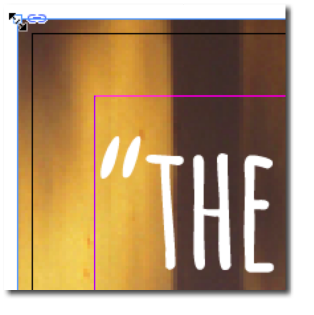
You'll now see a ruby bleed guide has appeared just exterior the border of the document.
Choose the Option Tool from the Tools Console and click on the edge of the frame that contains the flick.

Using the Selection Tool, drag the foursquare handle on the top left of the frame out to the bleed guide. Do the same thing with the handle on the lesser correct of the page, creating a 3mm bleed.
Finally, you'll create a pdf. Utilise File>Export as you did previously and cull the [PDF/X-1a:2001] preset from the options at the top of the Export Adobe PDF dialogue box. The pdf yous created previously was for an advert, and the assumption there was that the advertisement would exist placed somewhere in the middle of a page in a magazine, alongside others. Considering of that information technology would not be printed on its ain, nor need to be trimmed downward to size, nor need to let for any bleed. This affiche is dissimilar. As it's going to be printed conventionally it is advisable to add printers marks – things like trim marks they tin can use to trim the certificate one time it's been printed. To practice this, firstly click on Marks and Bleeds from the listing on the left hand side of the dialogue box.

In the Marks and Bleeds section of the PDF Export Dialogue box, check both the All Printer's Marks checkbox and the Use Document Bleed Settings checkbox before pressing the Export button.

If you look at the finished pdf (by double clicking on it, outside of InDesign) y'all'll come across the trim marks effectually the edge of the certificate, and also the area of the epitome outside the bleed guides that should exist trimmed off in one case the document has been printed.

Summary of what you've learned in this section
-
How to relink a missing image
-
How to change an RGB paradigm to CMYK
-
How to recognise a low resolution paradigm
-
How to notice / replace a missing font
-
How to add a bleed guide
-
How to export a pdf with bleeds and trim marks
Summary of new commands used
-
Links Panel>Relink (or double-click on missing link icon)
-
Links Panel>Edit With
-
Type>Detect Font
-
File>Certificate Setup
If you lot've been working through these exercises to try and sympathise what to exercise in order to send your own documents to print, at this point you've already covered everything that's generally likely to arise. If you want to proceeds an understanding of some other issues that are less likely to arise (such as spot colours and transparency problems) and an insight into some useful InDesign features like Packages and Preflight, please sign upward below to download our free pdf (email address required).

Source: https://www.designtuitive.com/blog/how-to-prepare-indesign-documents-for-commercial-printing-a-comprehensive-guide
0 Response to "Can You Make a Magazine Page Indesign and Upload It Into Another Page"
Post a Comment